
Puzzle platformer SCHiM is all about exploring the world via shadows. It’s a gorgeous, catchy game in which you must move using the the shadows cast by others in the world, and along the way there are so many collectibles to find. This epic guide will tell you how to get your hands on every single one.
In the universe of SCHiM, many people and objects have a little buddy that lives in their shadow. You’re a schim who got cut loose from his human, and over the course of what might be the longest week in both his and your life, must find your way back to him.
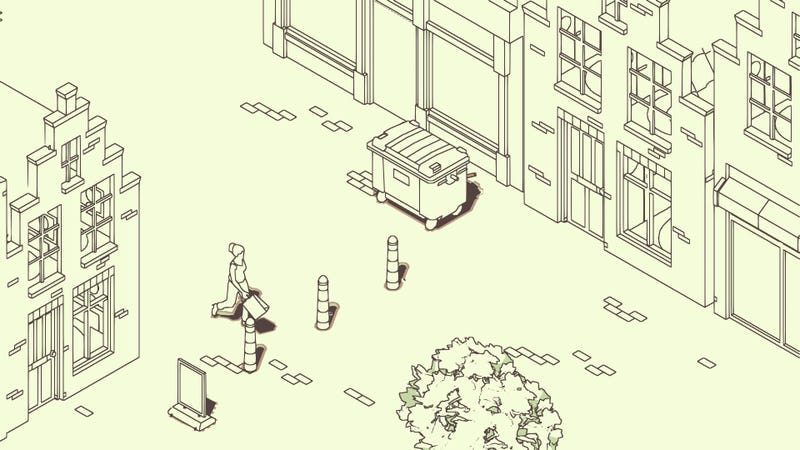
In the meantime, there are plenty of other schim in the city for you to meet. Many of SCHiM’s 65 levels have one or more random objects for you to find, each of which will help out a different “lost” schim.
You can generally tell when there’s a collectible in the area, as there’s typically a normal-sized schim hanging around somewhere nearby. A collectible is deliberately colored in such a way as to contrast with the current level’s color scheme, although a few of them are still deliberately difficult to spot.
When you find all 71 collectibles over the course of the game, you unlock the Collector achievement (or trophy) (Gold/100G). Any collectible you find is saved to your current profile on the spot. You don’t have to finish the level afterward for it to count.
Each stage you clear in SCHiM is automatically added to the level select in the main menu, along with an indicator of collectibles that might be left there, so you can go back at any time to pick up anything you might’ve missed. Doing so overwrites your current autosave, but it doesn’t matter that much.
Note: many of the collectibles take some real work to reach, and several don’t appear to be accessible at all without using your extra jump. If you were thinking that you might clean up your missing collectibles over the course of knocking out the The Floor is Lava or Risky Mode achievements, it’s probably not going to happen. Just finish Collector on easy mode, then go after the challenge runs without having to worry about making any major, potentially lethal detours.
This guide has been written with minimal spoilers, but a few are unavoidable. You might want to save this until you’ve cleared SCHiM on your own. It’s a fairly story-light game, but there are a couple of surprises to be had.
Levels 1-10
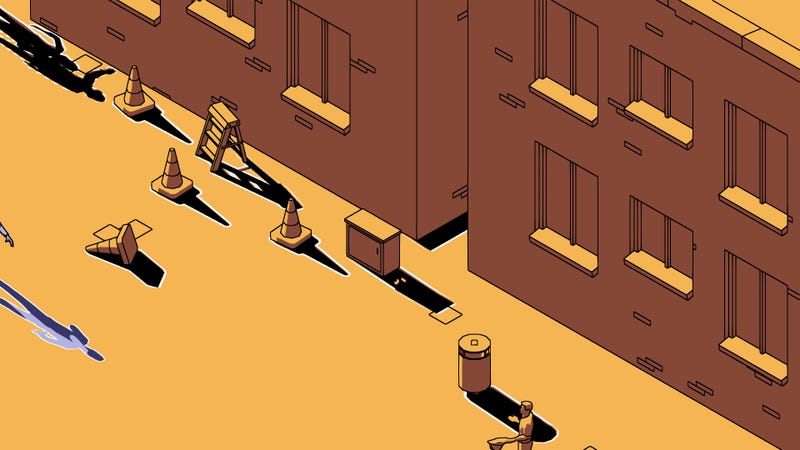
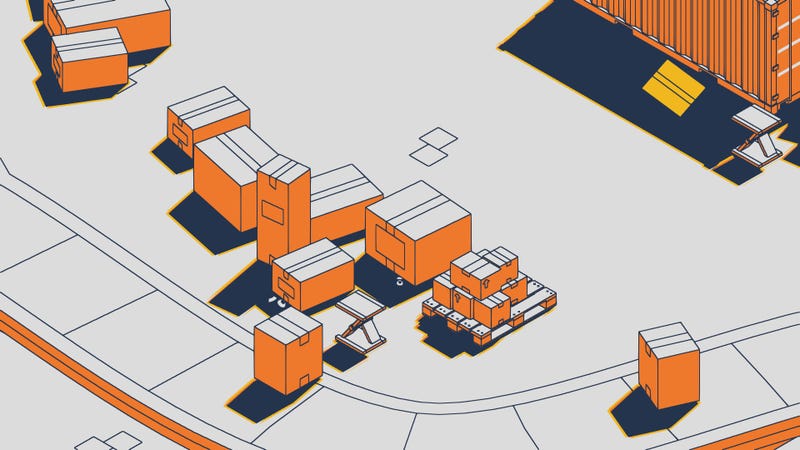
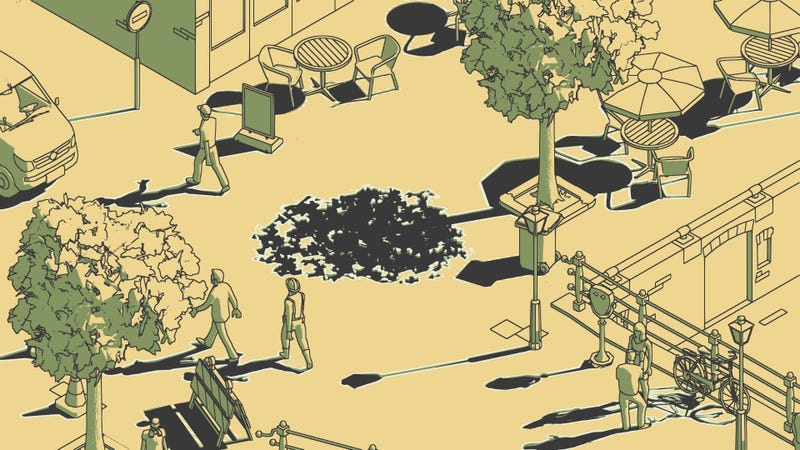
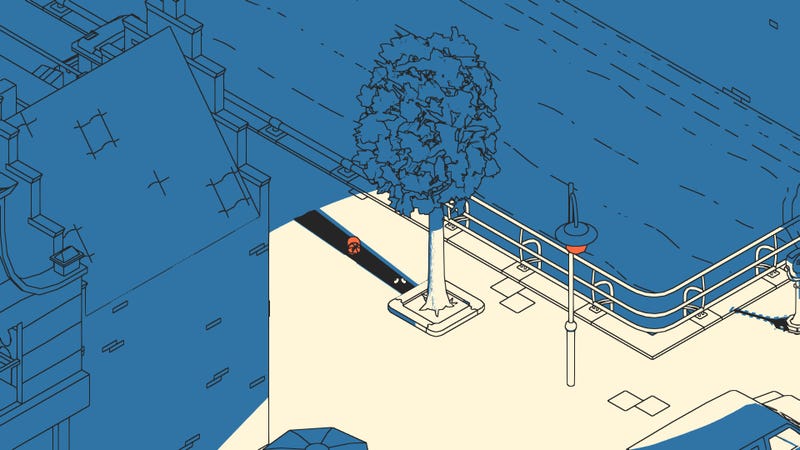
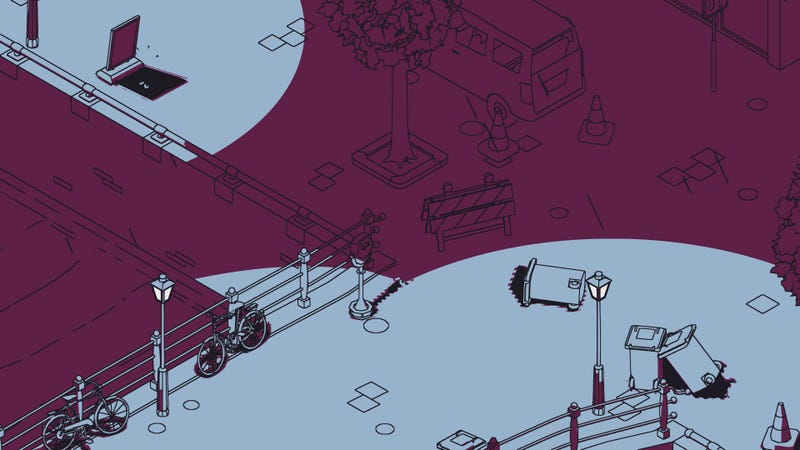
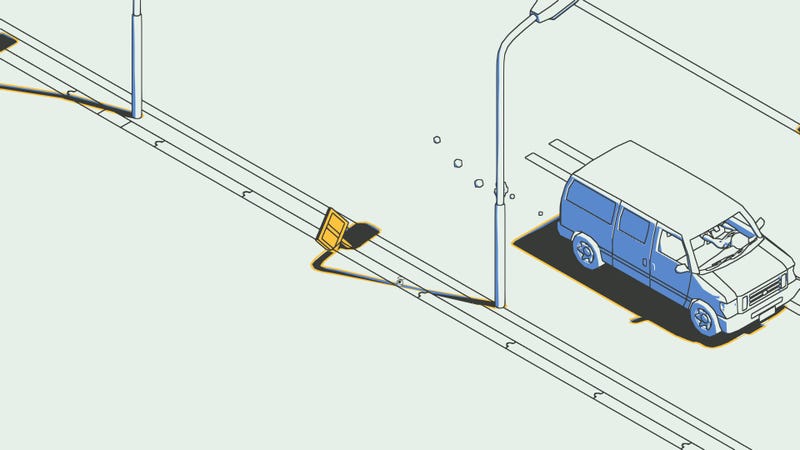
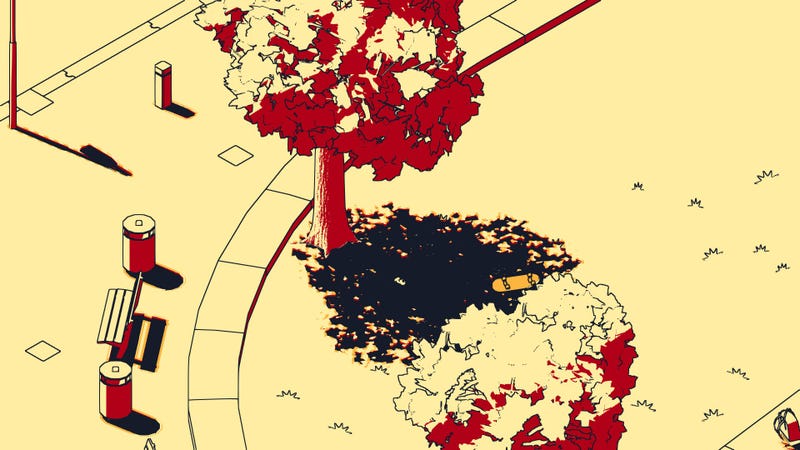
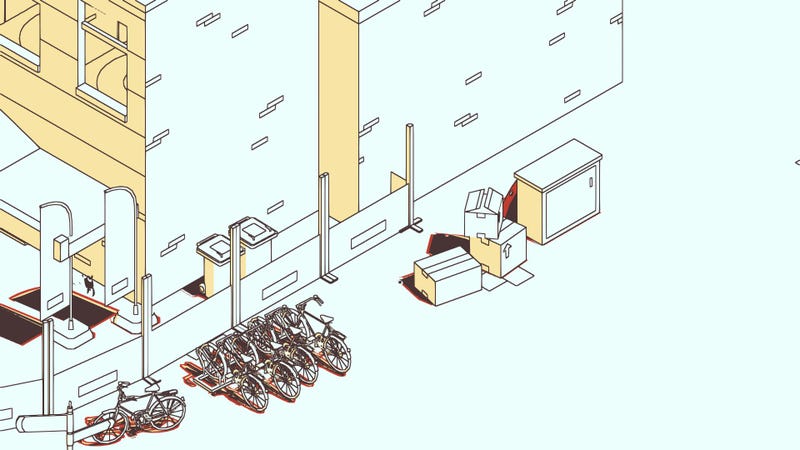
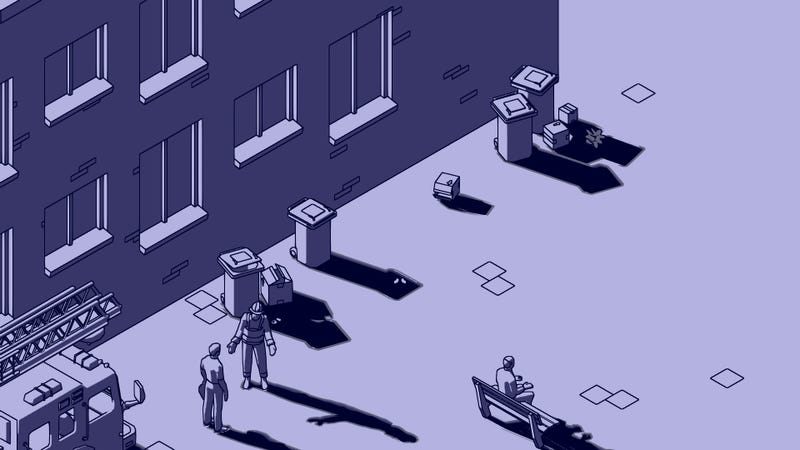
Level 1: Water Bottle
As soon as you can take control of your schim, jump into the nearby car’s shadow, then take a long jump towards the post to the right. The water bottle is behind the circular trash can near the curb (above, lower left).
Level 4: Beach Ball
This is impossible to miss, as it’s effectively a tutorial for the concept of collectibles to the game. It’s automatically highlighted as you make your way along the street towards the kid.
Level 5: School Bag
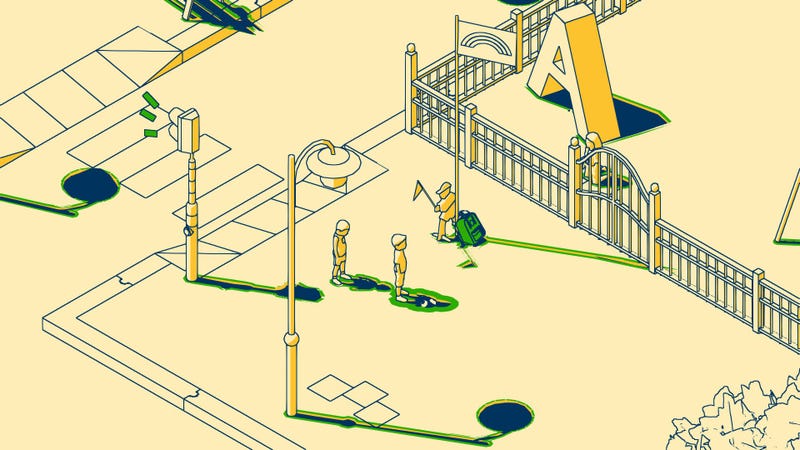
Right after you cross the crosswalk, hop out of the kid’s shadow and grab the backpack that’s leaning against the flagpole. It’s easy to mistake this as a meaningless background detail, but it counts.
Level 5: Trough
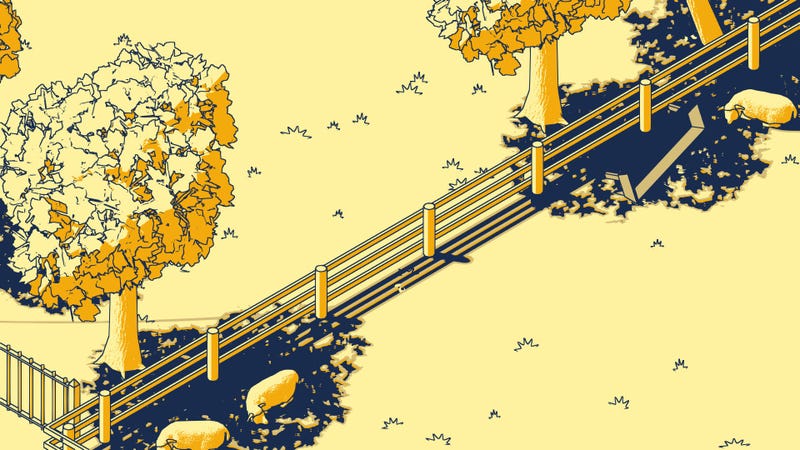
As you progress through Level 5, you’ll need to hop out of your human’s shadow to reactivate a glitched-out train crossing. On the other side, face the row of electrical transformers and hop into their shadows.
From there, jump into the trees’ shadows to the sheep pen’s fence. You’ll see the trough nearby (above, next to the sheep).
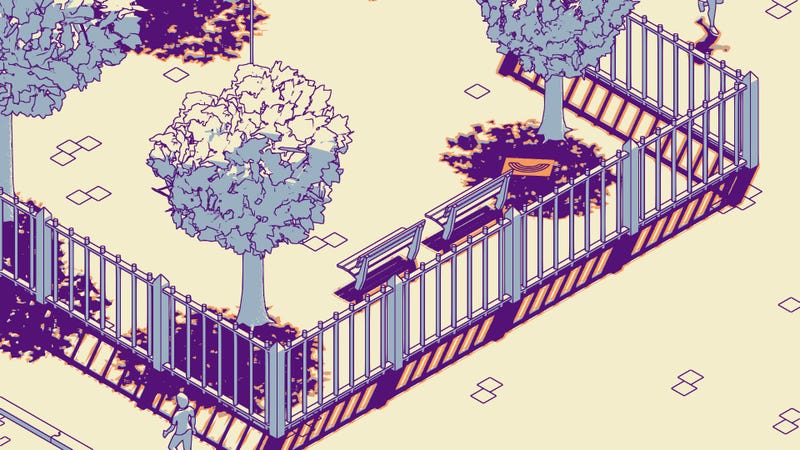
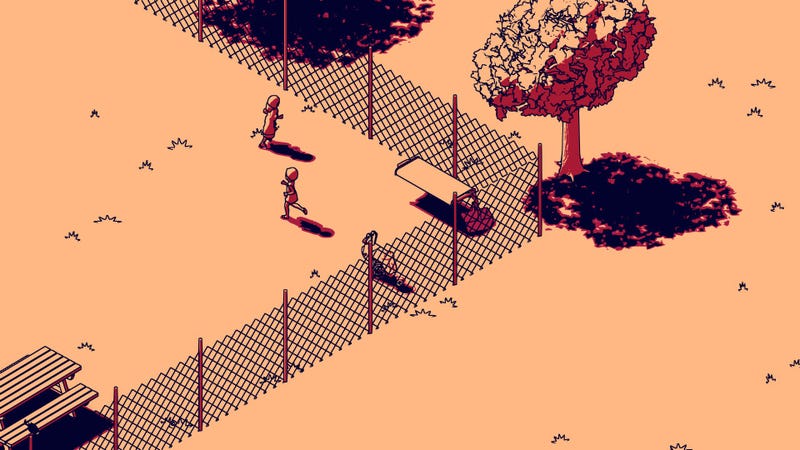
Level 5: Box of Chocolates
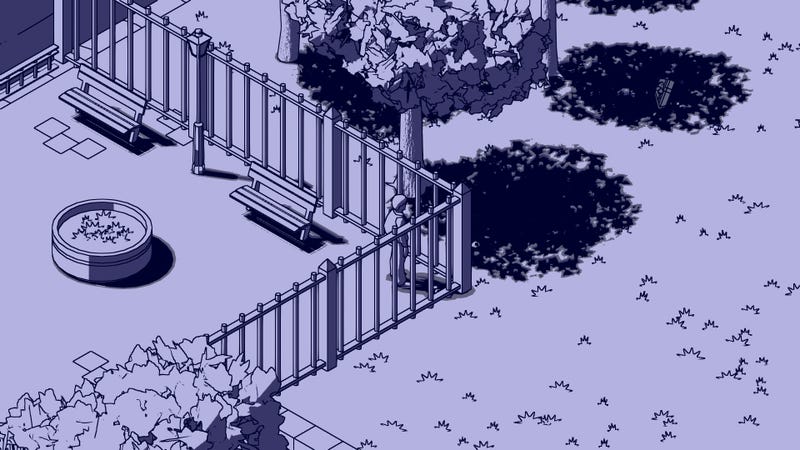
From the previous schim, continue through the stages of your human’s life until the abrupt break-up scene. At this point, walk into the background towards the two park benches. You’ll be able to see the box of chocolates in the corner of the screen (above, upper right). Grabbing them also unlocks the hidden achievement/trophy You Never Know What You’re Going to Get.
Level 6: Office Chair
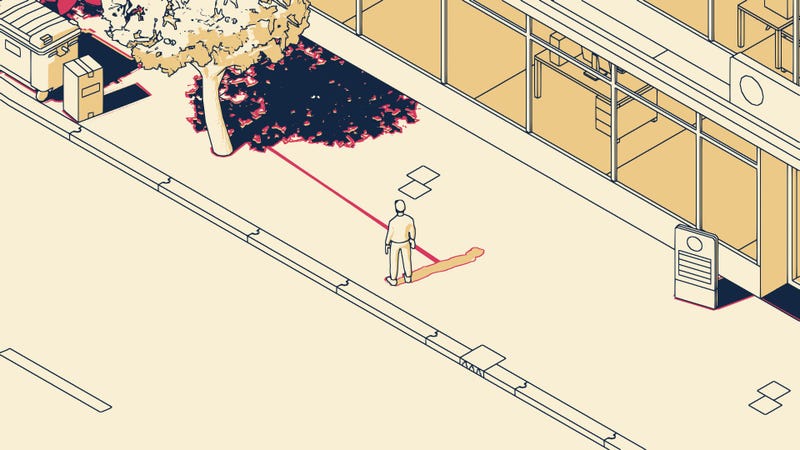
This is a strong contender for the sneakiest schim in the game. Before you go into the office building, walk as far past it as you can, then disengage from your human.
You should just barely be able to reach the distant tree’s shadow with your extra jump. The office chair is right behind it. If you’re careful about where you position your human, you should just see the chair on the top left corner of your screen (above, upper left).
Level 7: Helmet
At the start of the stage, leap from the two boxes to the bystander’s shadow, then to the trash can. The helmet is in the nearby dark alley (above, center), where it’s only visible for a second or two whenever you switch your camera angle.
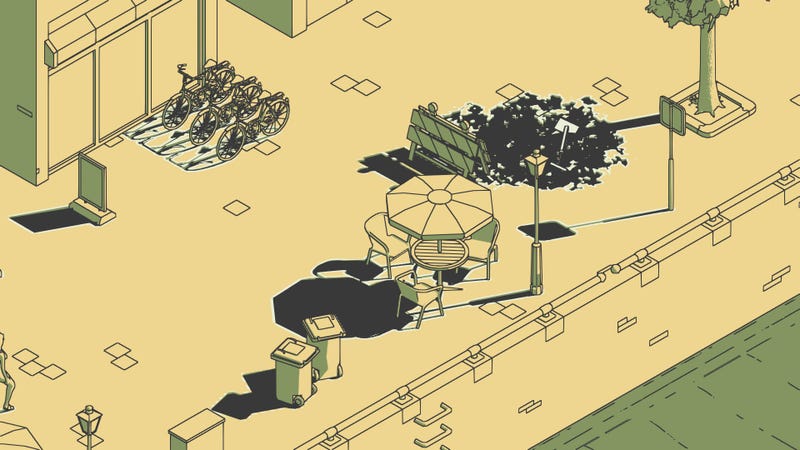
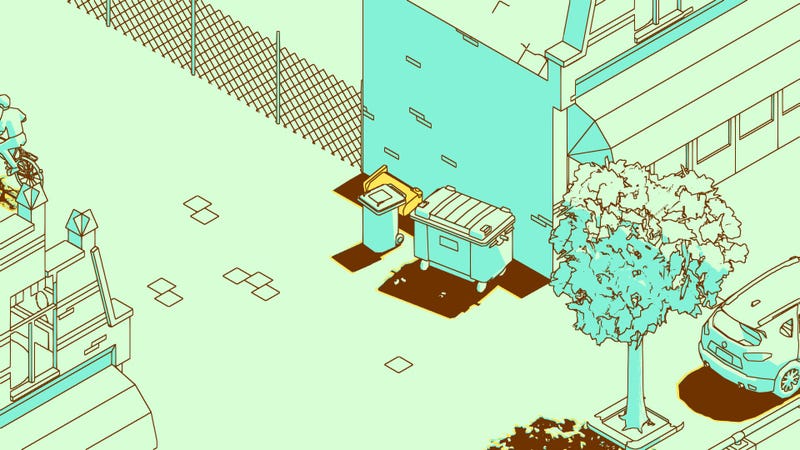
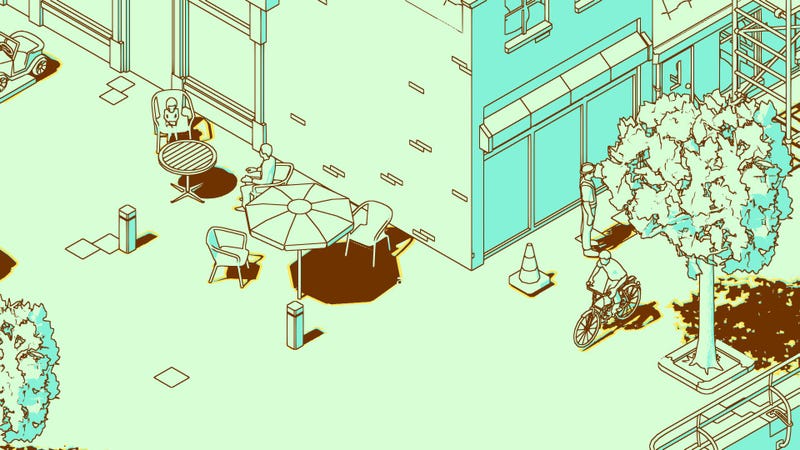
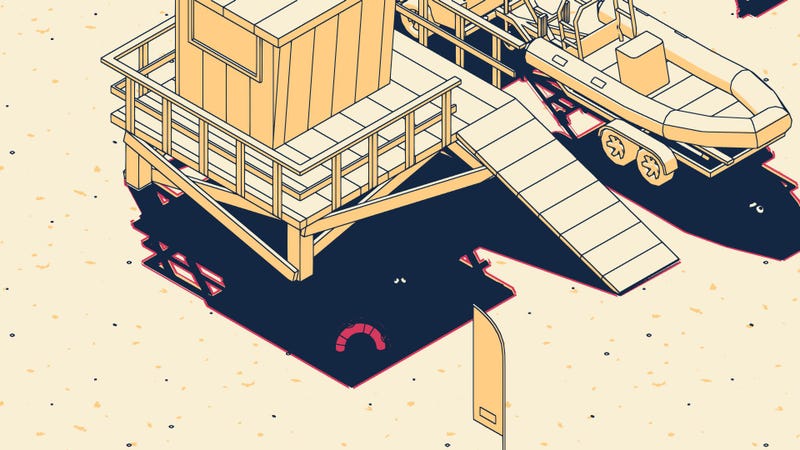
Level 8: Beach Chair
From your starting point, turn around and use the nearby ad board to launch yourself in the opposite direction from where you want to go. Jump into the flag’s shadow, then turn left and use the passersby to get closer to the line of bollards in the distance. The beach chair is behind the dumpster next to them (above), where it’s barely visible.
To get back on track, use the ad board near the bollards to launch yourself back the way you came.
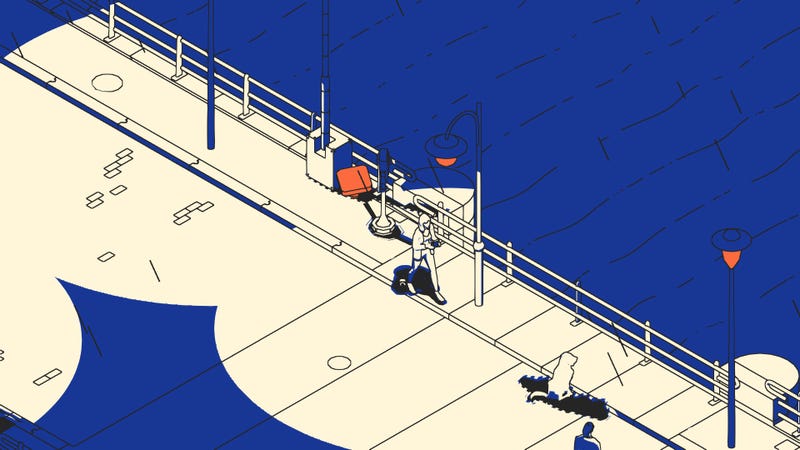
Level 8: Postcard
Progress through level 8 as normal until you reach the fountain (above). Jump into the shadow of a passerby who’s going to the left and ride along until you see a stepladder. The postcard is poking out of its shadow.
You’ll need to use another passerby or two’s shadows to cross the street and grab the postcard (above, top center).
Level 9: Teddy Bear
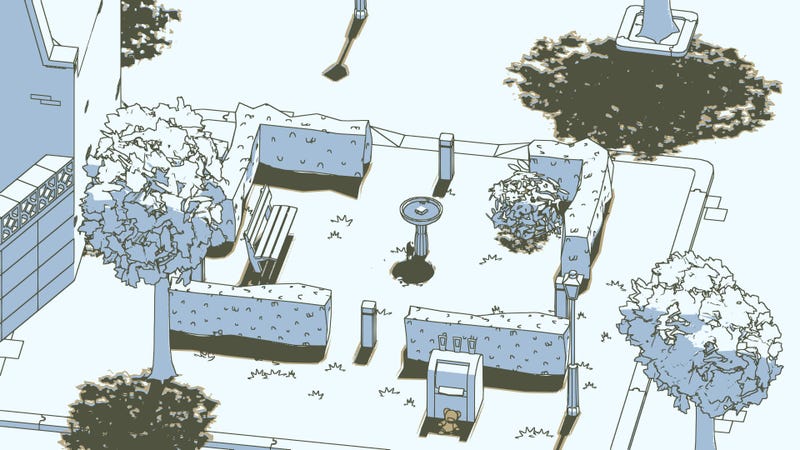
Go through this stage as normal, but when you reach the fork in the road, go left instead of right. If you follow the other schim, it leads you to a nice little park in a side lot. The teddy bear is hidden behind the mailbox in that park (above, bottom center), and is plainly visible if you rotate your camera a couple of times.
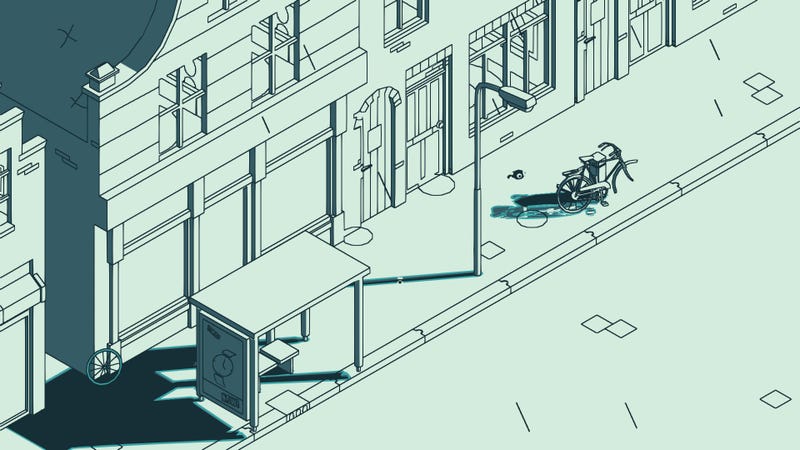
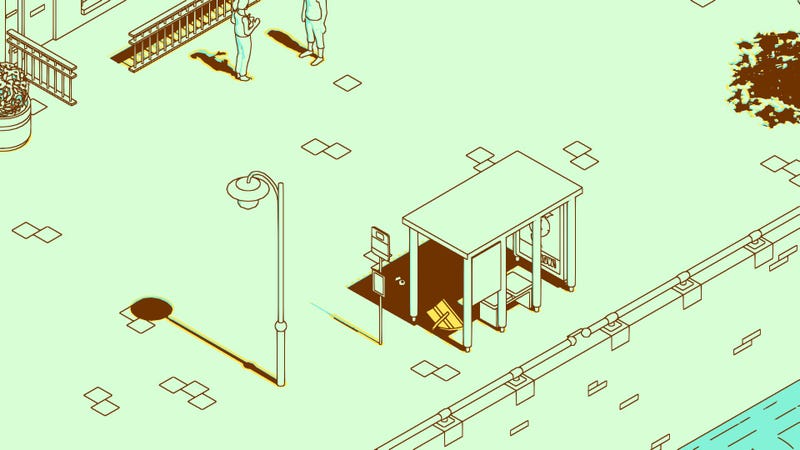
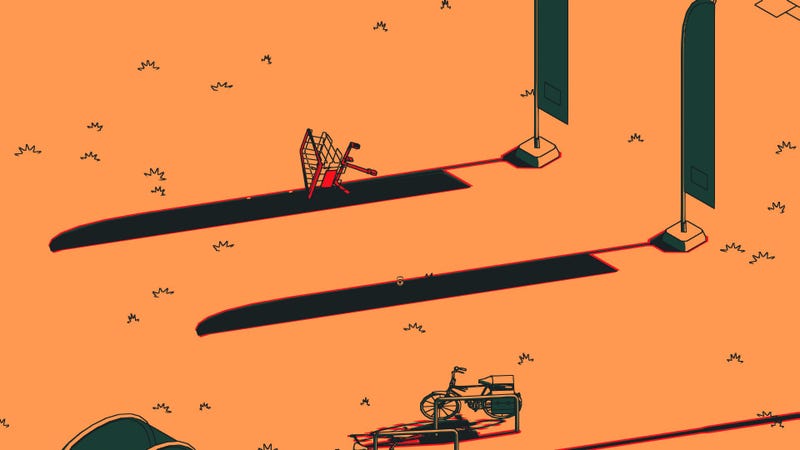
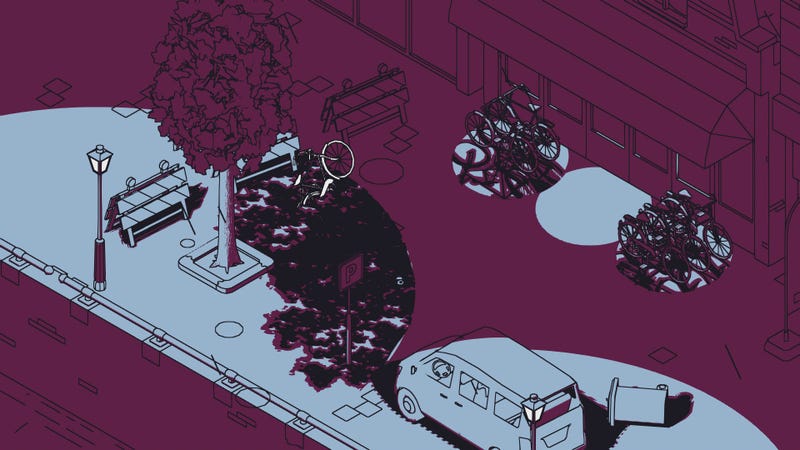
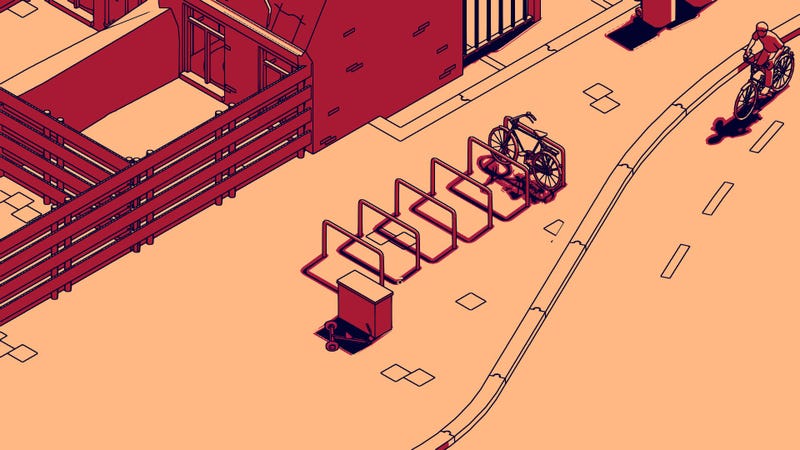
Level 10: Bike Wheel
Your goal when you enter this stage is to reach a particular cat so you can ride its shadow out of the level. The fastest way to do so is to go from the garden to the various benches around the girl who’s playing in the rain, then use a pedestrian to reach the shadows next to the cat.
The bike wheel requires you to go significantly out of your way, and it can take a while depending on the order in which the cars and pedestrians arrive. If you use a car’s shadow to get as far down the street as you can, you’ll find the bike wheel leaning against a wall in an alley next to a bus stop (above, lower left). It’s more or less directly opposite the cat.
Levels 11-20
Level 11: Package
This is another collectible that’s hidden in plain sight. As you progress through the level, be sure to grab this white box off the stoop of your human’s apartment building (above, top center). It’s not porch-pirating if you’re grabbing it for your unwitting host.
Level 13: Anemometer
From the start of the level, jump from your garbage truck to the first bicyclist you see. When they stop at the crosswalk, jump into the shadow of the nearby cargo truck, then wait for a car to come by that’s going the other way. Hitch a ride on its shadow until you see a car parked by a big roadside sign. The anemometer is behind that sign (above).
Taking this collectible also reactivates the nearby windmill. If you touch its fan, you get slung across the street the way you came, into the shadow of the car behind the cargo truck, and can go on with the level as normal.
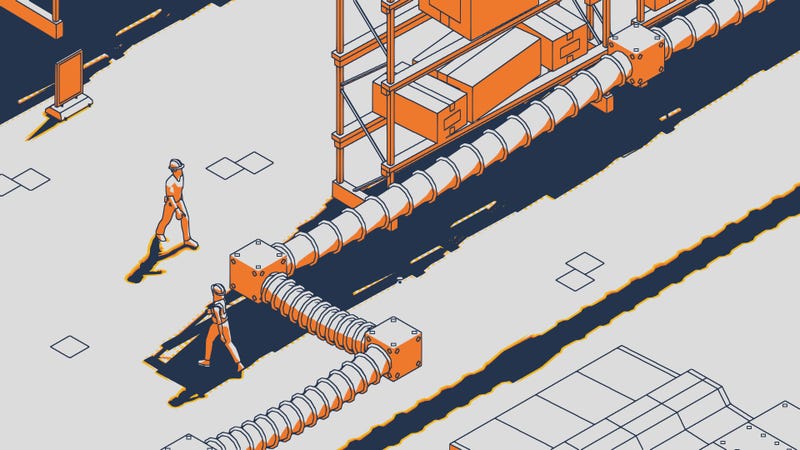
Level 14: Misplaced Package
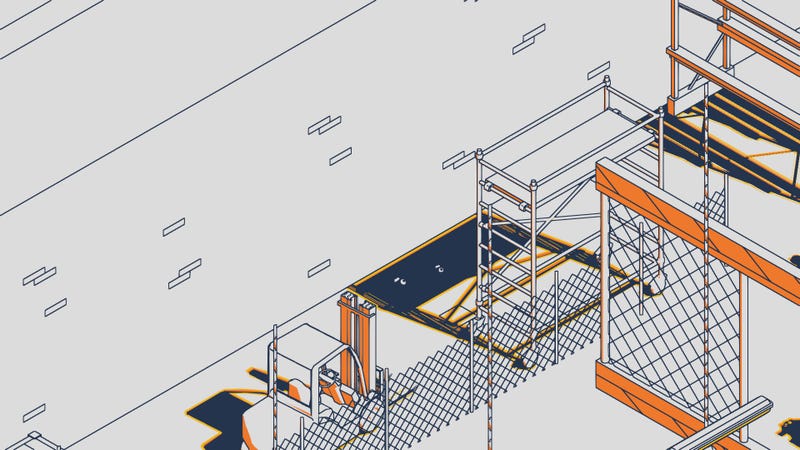
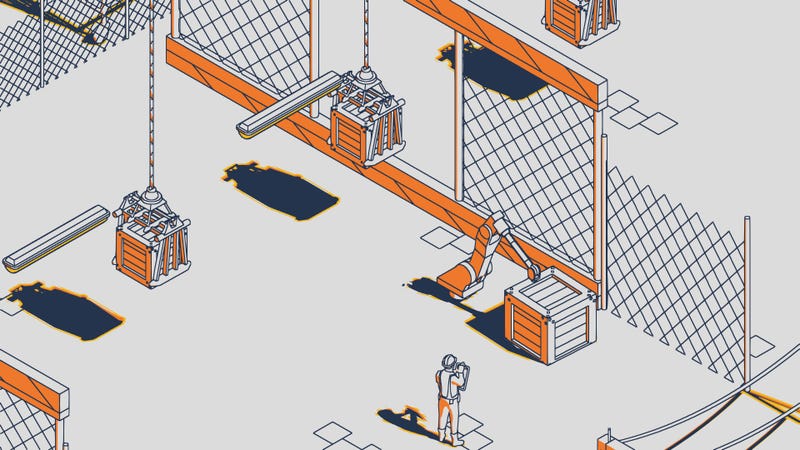
At the beginning, ride a forklift inside the warehouse to reach the first of several conveyor belts. Use the spring to launch yourself onto the belt and ride the passing packages’ shadows. Just before the fork in the belt, hop off of it into the messy pile of crates. You can see the misplaced package from here (above, top right), but you can’t reach it yet.

From here, jump to the nearby shipping containers and use the spring next to them to launch yourself to the parked forklift. While you’re in the forklift’s shadow, hit the interact button to raise its forks, which also extends its shadow. Not only is this a useful trick to remember for the rest of the stage, but it gives you enough clearance to reach the misplaced package. You can use the nearby spring to return to the pile of crates and continue the level.
Level 14: Wrench
Continue through the level until you reach the shipping lane for crates. At its far end, you’ll find a worker who’s testing a robot arm. Instead of jumping into that worker’s shadow, go a little further, past the last hurdle, into the storage area.
At the end of the lane, jump into the shadow of the guy standing on the left. From here, you can jump from the nearby gangplank to the forklift to the shipping containers. The wrench is at the end of the lane behind the second container (above, lower left).
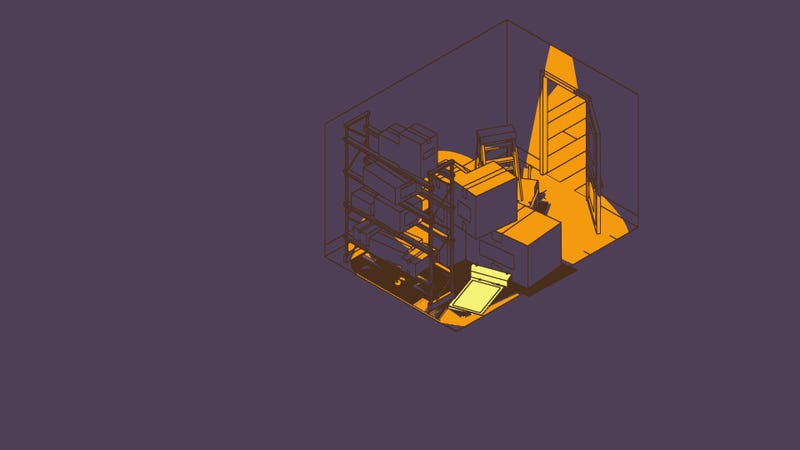
Level 14: Crate
Towards the end of the stage, you end up in a packed storage area, where you have to navigate between tall shelves by using passing workers or forklifts’ shadows as stepping stones. You ordinarily leave this area by jumping into a pipe and letting it take you to the end of the level (above).
If you jump against that pipe’s current for long enough, however, you can take it to reach to a very well-hidden area where you can find a stray crate that’s fallen off its shelf (above).
Level 16: Chair
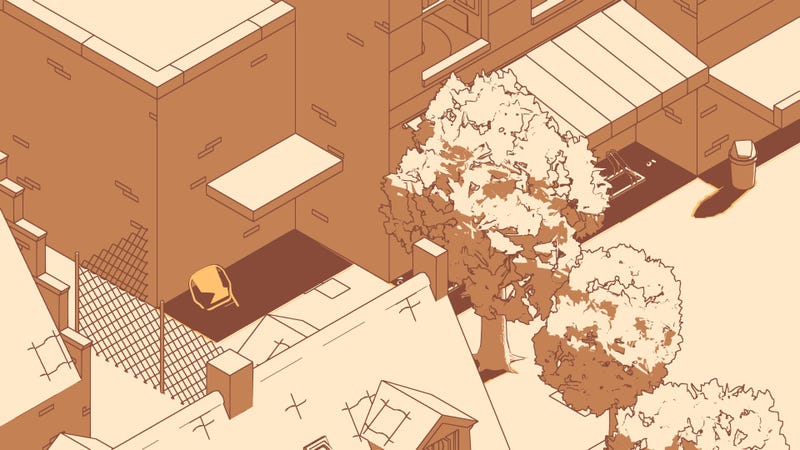
At the end of the stage, before you jump into the dog’s shadow, backtrack slightly and visit the nearby restaurant’s outdoor seating. Both the schim and the chair are in the shadows against the side of the building. It’s an easy grab as long as you don’t leave before you’ve got it.
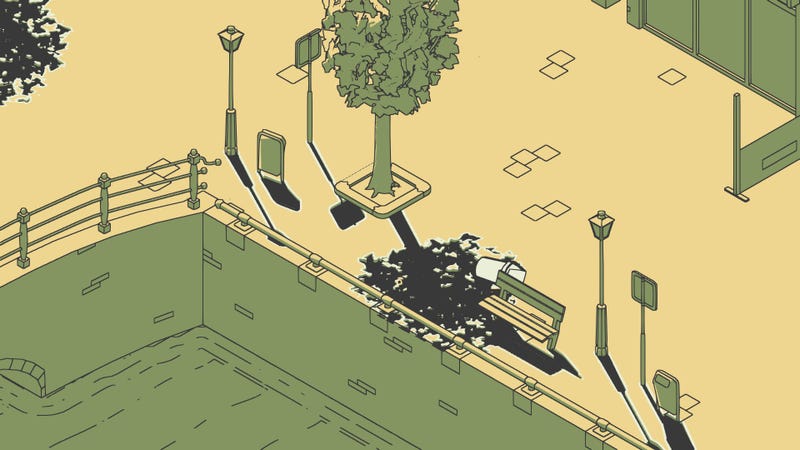
Level 17: Screwdriver
From your starting point, keep jumping from shadow to shadow along the nearby canal until you see this collectible next to a tree. The screwdriver (above, left of center) is the same color as the inexplicable highlights of this level’s color scheme, which can make it tricky to spot.
Level 18: Walking Cane

This stage is set on four separate “islands” in the city’s canal system. You begin on the first one. If you jump from tree to tree along the edge of the current island, you’ll spot the abandoned cane in the shadow of the park bench (above, right).
Level 18: School Bag
Ride a jogger’s shadow to the second island and get off at the playground. You may have to adjust the camera to see it, but the school bag is in plain view near the jungle gym.
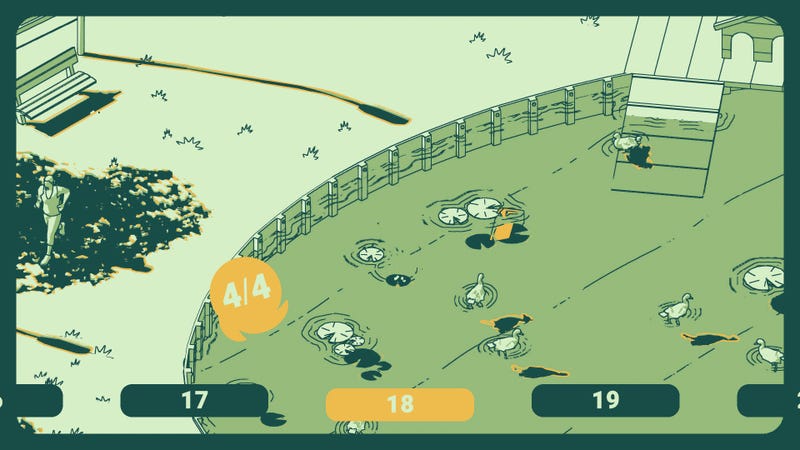
Level 18: Trash Can
You’ll probably spot this on your own. The third collectible in level 18 is in the duck pond on the third island (above, bottom center). It’s an easy jump from the shore.
Level 18: Bike
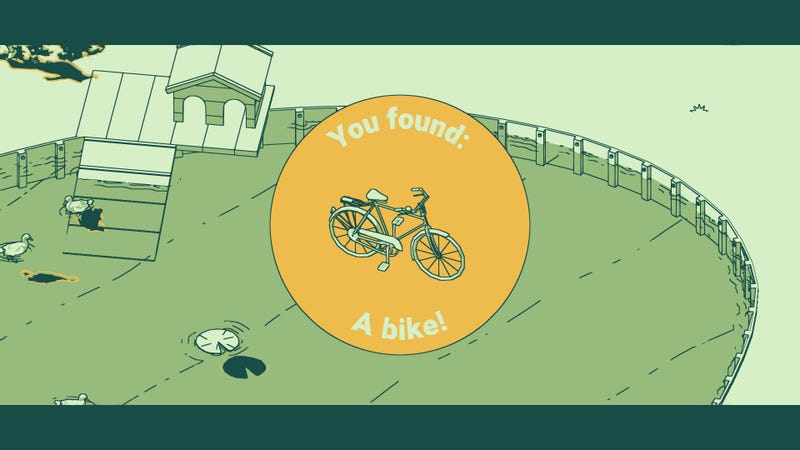
If you grabbed the previous collectible, you’ll likely find this one by mistake while you’re trying to get back out of the duck pond. It’s only a few yards away from the trash can, in the same pond.
This is likely because the ducks stole your human’s bike back in level 5. Study it out, people.
Level 19: Plastic Trashcan
From your starting point, take a few hops right to the parking meter, then take a big jump over to the lamppost across the street. That’s the hard part; now you can grab the plastic trashcan that’s on its side nearby (above, center).
Level 19: Bucket
From the previous schim, progress through the level as normal until you see a lost schim circling in the shadow of a parked car. Use the shadows cast by the two guys next to that car to reach the schim, then pick up the bucket from underneath the nearby patio tables (above, off-center).
Level 19: Bicycle Pump
As you go through the level’s main path, you pass near a bridge with a lot of people on it. Cross that bridge to its far side, then orient the camera so the bridge points towards the upper-left corner of your screen, as above.
There’s a collectible in either direction here. If you turn right from here, you should spot the bicycle pump in the shadow of a tree at the end of the lane (above). It’s thin enough that it’s hard to see.
Level 19: Barrier
From the previous collectible, go back to the bridge and go the other way. There’s a line of traffic barriers here, and you can pick up the one in the middle that’s been knocked over.
Level 20: T-shirt
At the start of the level, jump into the shadow of the first passing car and let it take you all the way to the small bridge. Before you raise the guardrail, jump out into the nearby streetlight’s shadow, then to the parked van.
From the van, get to the other side of the nearby fence. It’s tricky, but there are enough small shadows back here to get to the laundry line in the distance, and from there, to circle around to the house’s back patio. The t-shirt is behind the nearby fence (above).
Levels 21-30
Level 21: Flag
This level requires you to make your way across two separate bridges by riding along with passing bikers. If you pay attention as you reach the end of the second bridge, you’ll spot this level’s lost schim pacing in the shadow of a stop sign.
The matching collectible is in the nearby fenced-off park, which is easiest to spot by looking for the yellow advertising board on its closest corner. Getting inside is easy, at which point you can spot the flag lying flat underneath a tree (above). To get back to the rest of the level, it’s easiest to wait for a pedestrian who’s going the right way and hitch a ride.
Level 22: Container
This stage is packed, considering how short it is. When you reach the traffic stop near the start of the level, get into the streetlight’s shadow and hitch a ride with one of the bicyclists in the left turn lane. Ride that shadow all the way down the street until you spot a dumpster by the side of the road, which is easier if you rotate the camera as soon as you make the turn. This recycling container is overturned behind it.
Level 22: Bucket
This one’s tricky. When you reach the ice cream shop, wait under the parasol for a bicyclist to come down the nearby side road (above). There is a very slim window of opportunity for you to jump from that bicyclist’s shadow to the nearby tree that overlooks the canal.
If you can make that jump, the rest of this is duck soup. Make your way down the side road, past the construction gangplank, to find a bucket in the shadow of a tree at the end of the lane. Once you grab it, a couple of extra traffic cones spawn in the road, which make it much easier to get back the way you came.
Level 22: Handbag
Right before the end of the stage, you can spot this in the bus stop.
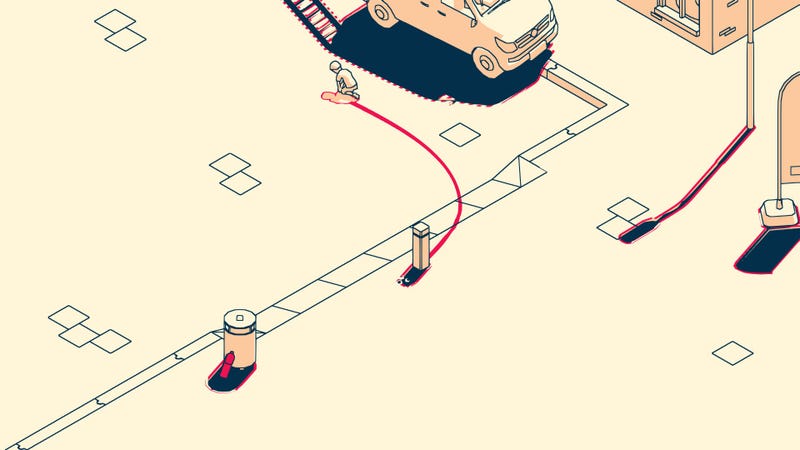
Level 23: Shopping Cart
At the beginning of the level, go to your right along the curb. When you reach the street, hop into the traffic barriers’ shadow and lower them, which lets you use their shadow as a bridge to cross the road. On the other side, raise the closest barrier again, which lets you hop into the nearby flags’ shadows. The overturned shopping cart is behind the furthest flag.
Level 23: Cornflakes
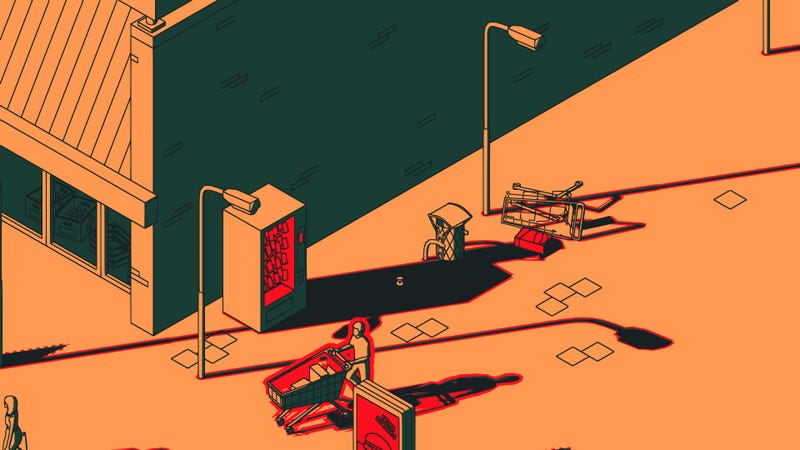
Before you ride a shopper’s shadow into the supermarket, go past the building until you see the vending machine. The box of cornflakes is right next to it in another overturned cart.
Level 24: Soda Crate
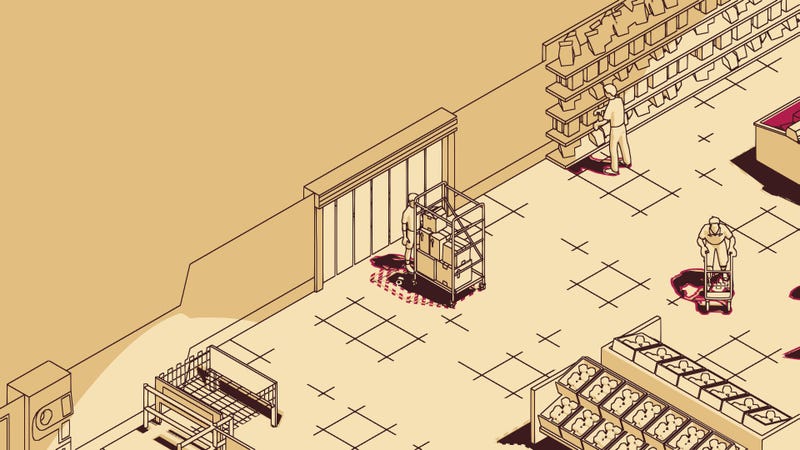
This one’s sneaky. You’ll likely spot the lost schim within seconds of starting the level, which is hanging out in an employee’s shadow near the store’s entrance. What the game doesn’t really show you is that you can leap right through the doorway behind the schim (above), which takes you to the supermarket’s stock room.
Navigate through the shadows, past the forklift, to one of the ad boards. Use it to launch yourself to the far end of the room, past the bar, to find the soda crate propped up behind it (above, bottom center). You can then use a second ad board to launch yourself back the way you came and carry on.
Level 26: Child’s Cap
This is the same map as level 22, but reversed and at night. Head back to the side road by the ice cream shop where you found the Bucket, and once again, wait for a passing bicyclist. If you time it right, you can use their shadow to reach the tree across the street and grab the child’s cap (above, center).
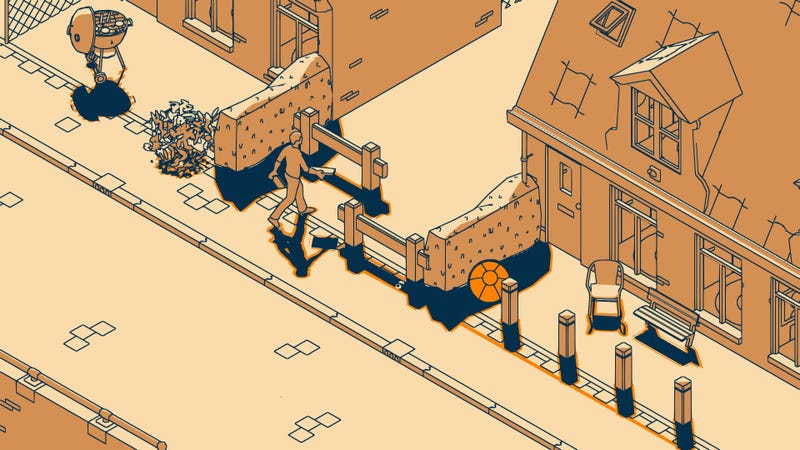
Level 27: Traffic Cone
You only have to go a little out of your way for this one. Just before the last turn-off to your final goal, look for the dog by the side of the road, next to the person who’s pacing in circles. The overturned traffic cone is next to them, at an angle that makes it look like a big orange rectangle.
Level 28: Umbrella
This is one of the more difficult sequences in the game. From the start of the game, go straight forward along the road, but don’t turn onto the bridge over the canal. Instead, keep going forward until you reach a couple of big traffic barriers (above).
The challenge here is to use the combination of the flickering streetlights and the lightning flash to navigate across the street. This requires you to anticipate and preemptively jump so you land in a new shadow right as it’s being made. Once you’ve got a grip on the timing, you can use your extra jump to provide some leeway, as your schim won’t respawn until it’s been on the ground for a couple of consecutive seconds.
It’ll take some practice to nail the timing, but once you get it down, you can grab the umbrella off of the street on the other side of the raised drawbridge (above, top left).
Level 28: Brand New Bike
From the previous schim, go back the way you came and cross the bridge. At its end, you’ll spot a lost schim in the shadow of an advertising board (above, top left), but there’s no cover between it and you.
Like the umbrella, you have to time your jumps here to take advantage of the lightning, which flashes roughly every nine seconds. You’ll have to jump early so your schim is in mid-air when the shadow appears. If you time it right, you should have just enough time to get from the tree’s shadow to the ad board before the lightning fades out.
From there, simply go down the street past the board to find a brand new bike by the traffic barriers (above, top).
Levels 31-40
Level 31: Hubcap
At the start of the level, don’t change your camera orientation just yet. It makes it easier to give you directions.
Go to the street and hitch a ride on a car that’s headed to the right. When you reach the circle drive, bail out and find a second car or truck that’s going to the lower right, towards the long hedge in the middle of the road. The hubcap is next to that hedge (above).
Level 32: Ball
As you make your way down the street, keep an eye on the canal for a row of three pillars. The ball is floating in the water next to one of them. The trick is that the stage’s design is encouraging you to stay on the far side of the street so you can’t spot the collectible.
Level 33: Picnic Basket
In the playground, use one of the spring-loaded rocking horses to fire yourself into the far corner of the yard, next to the two kids who’re playing by themselves. The picnic basket is next to them, under the bench.
Level 33: Tricycle
When you reach the bus stop at the end of the level, skirt around the bus and go down to the end of the street. The tricycle is behind the junction box next to the row of bike racks.
Level 34: Wheel
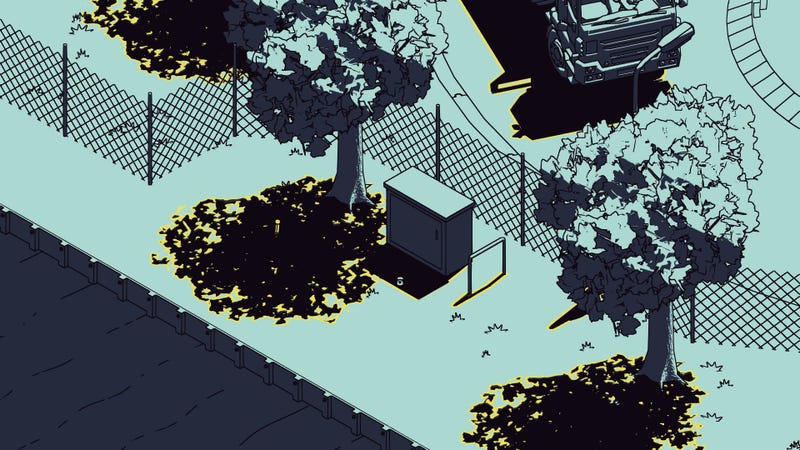
In the gas station’s parking lot, look for the gap in the back corner of the fence and go through it. The wheel’s barely hidden in the tree’s shadow.
Level 34: Jerrycan
On your way out of the level, take time to check the trash area behind the gas station. The jerrycan’s back here next to one of the dumpsters (above, left).
Level 35: Highway Sign
If you’re alert, you’ll see this during the introductory sequence. The highway sign is in the shadow of a streetlight just above your starting position. It can be a little tricky to reach, but at this point in the game, you should be used to playing Frogger with oncoming traffic.
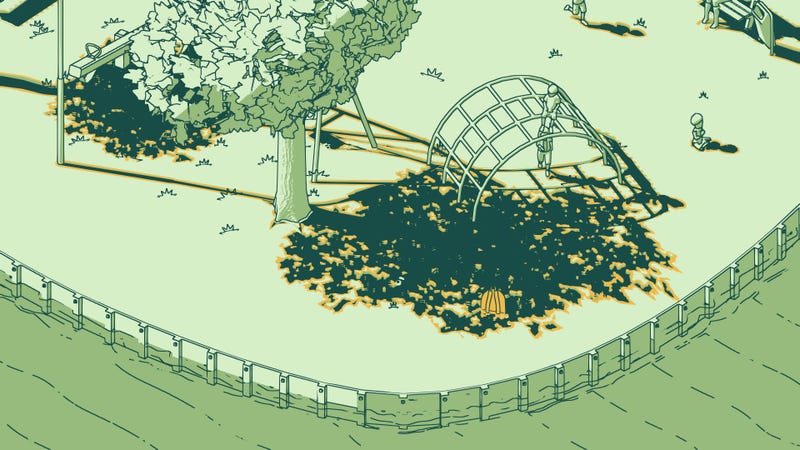
Level 36: Egg
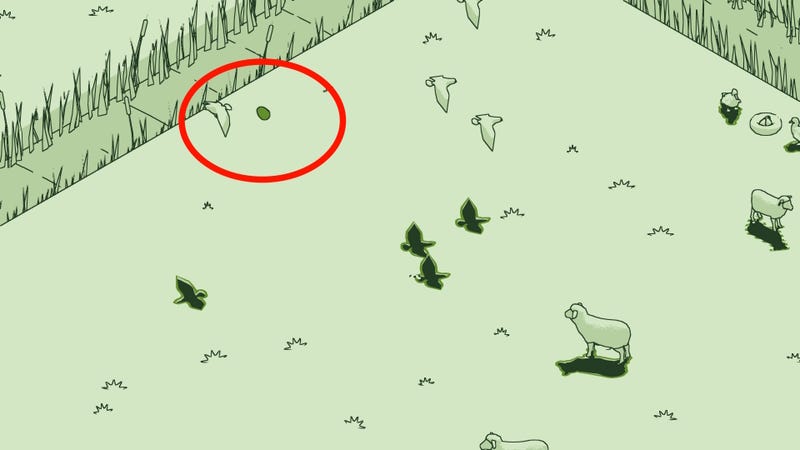
This level’s all about riding bird shadows. After your first bird taxi, you’ll end up in a corner of the farmyard with a trio of birds who’re constantly flying in a circle. You have to time it very well, but you can jump from one of those birds to another one who’s in orbit above the egg (above, circled in red).
It’s easy to spot, but it’s also easy to mistake as set decoration, and you pretty much have to make a suicide dive for it.
Level 37: Pitchfork
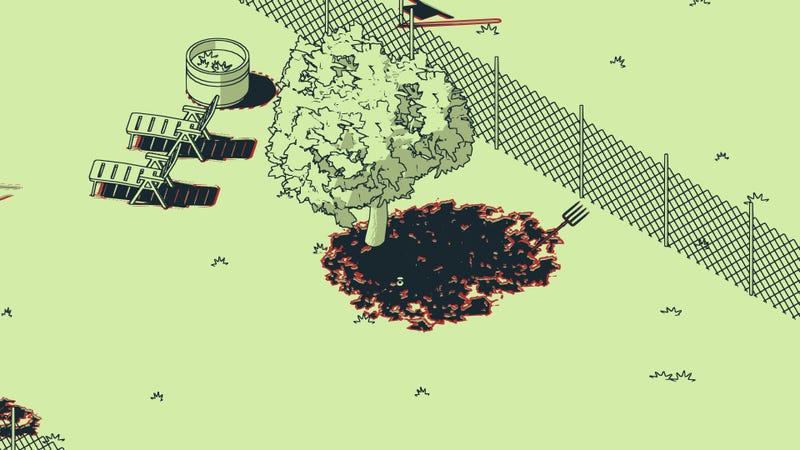
In the back yard, once you’ve used the clothesline to launch yourself over the fence, look for this in the shadow of the nearby tree. It’s behind the two deck chairs.
Level 37: Kite
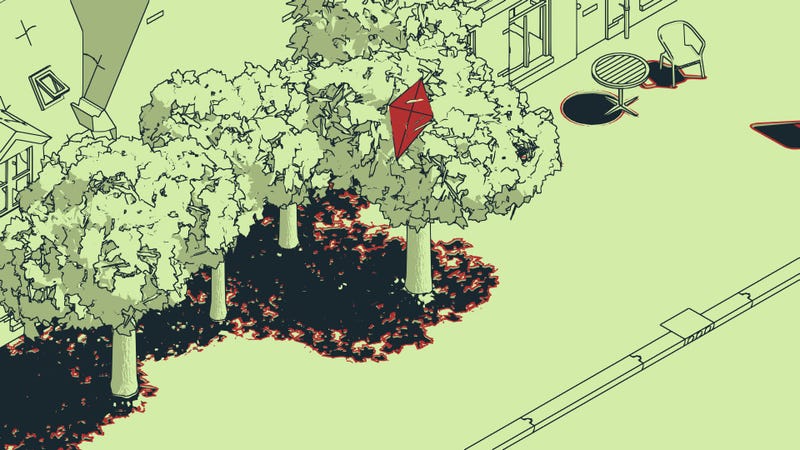
When you get around the row of houses to the front, you’ll see a cutscene where your human rides away on a bike. At this point, continue circling the houses until you reach the copse of trees with a schim jumping around in their shadow. If you rotate the camera, you’ll spot a kite’s stuck in one of them. Shake it out of the tree to grab it.
Level 38: Lifebuoy
You begin this level out in the water, and must navigate through a few parasailers, pigeons, and uh, pswimmers to get back to dry land. When you do, go down the row of pilings and break left once they end. If you use the parasols to fire yourself a little further up the beach, you’ll eventually find an out-of-the-way lifeguard tower with a truck parked outside it. The lifebuoy is next to it, in the corner of its shadow.
Level 38: Treasure
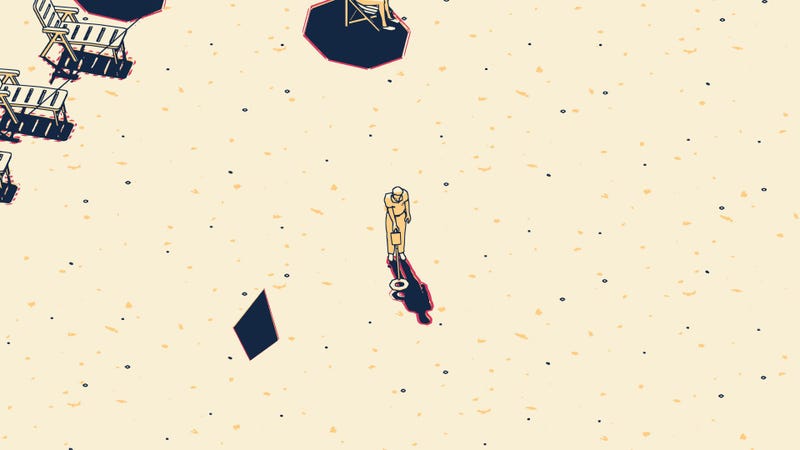
Next to the aforementioned row of pilings, there are two kids flying kites. When you jump into a kite’s shadow, you can pilot it a short distance like you could with the shipping drones in level 14. Use one of the kites to drop yourself off nearby, in the shadow of the guy with the metal detector (above).
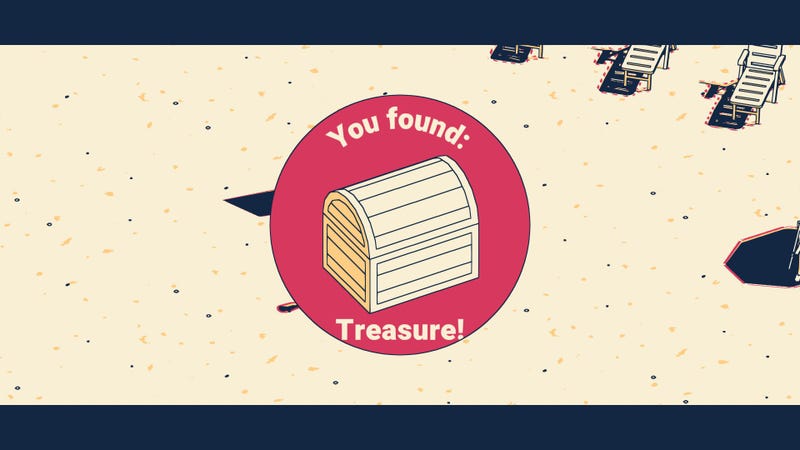
If you press the interaction button while you’re in the metal detector guy’s shadow, he’ll dig up a treasure chest, which you will automatically collect.
Level 40: Parasol
When you reach the sidewalk next to the parking lot, circle around it until you find the dumpsters. The parasol is behind them. It’s more obvious if you switch the camera angle to put the dumpsters in the foreground.
Levels 41-50
Level 41: Pruning Shears
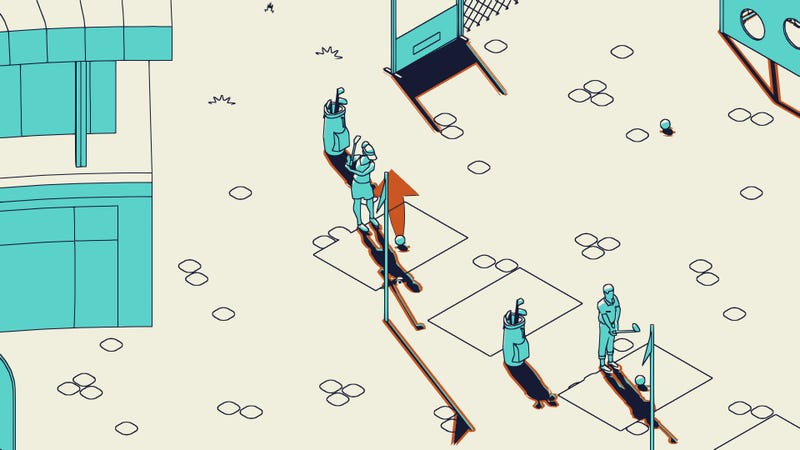
This stage is really short if you head right to the exit, but we’re going to take a detour. Head into the outdoor seating and use the ad board to launch yourself across the way, to a second ad board. That one will propel you into the practice range. If you hop into the lady golfer’s shadow (above), you can interact with her to determine the direction of her next swing.

Launch a ball over the fence to her left, as far into the yard as you can get it. The next time the golf club’s weird lawnmower Roomba comes by, hop into its shadow and ride it to the trio of flagpoles in the corner of the yard. The pruning shears are in the shadow of the nearby hedge (above, right).
Level 42: Bird’s Nest
Check the trees directly above your starting position. The bird’s nest is right out in the open (above, right), but you’ll need your extra jump to get there.
Level 43: Suitcase

This seems to be one of the only time-trial collectibles in the game. From your starting position, your goal is to reach a little kid on the opposite side of the train station platform.
There are two bystanders who will walk past the kid to wait for their train, then stand there permanently. You need to get to them before they get past the kid, so you can ride in one of their shadows to the waiting area. Once you’re there, it’s easy to grab the suitcase from beneath the overhang, but you have to get to those bystanders before they’re too far away.
Level 44: Soda Can
In the train station, don’t go straight for the commuter’s shadow. Circle around the escalator and jump to the bench behind him. If you rotate the camera, you’ll be able to see the soda can, which is behind a stack of crates next to the nearby vending machines (above, top left). Take a long jump to get there and back.
Level 45: Hat
Check the little seating area next to the shop (above, left). It’s across the station from the woman who serves as the level exit.
Level 46: Skateboard
Cross the street and turn left. The skateboard is in the shadow of one of the trees in the little grassy area where a lady’s meditating.
Level 49: Mug
Once again, don’t reorient your camera. Jump into the shadow of any car on the road that’s going to the left, and take it as far as it’ll go.
Now flip the camera 180 degrees and use another passing car to get to the the other side of the street. You should be overlooking the canal. At this point, two pedestrians will come by. Jump into one of their shadows and ride it to the mug, which is sitting in the shadow of a nearby lamppost.
Level 49: Boot
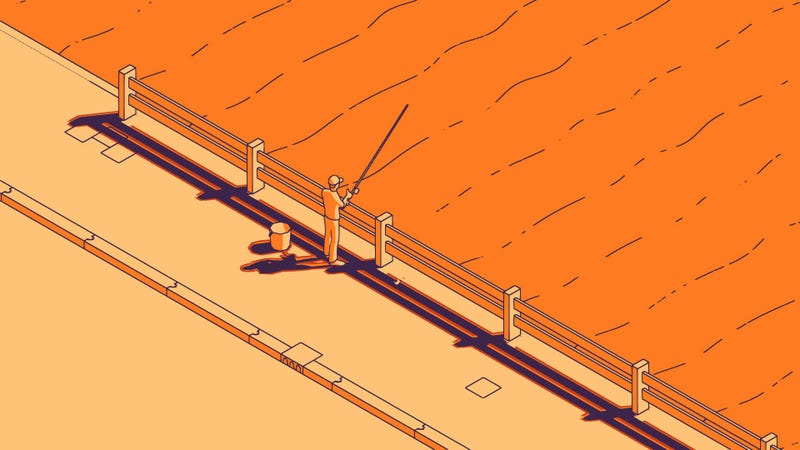
When you reach the train tracks, backtrack slightly and use the nearby crosswalk light to get any nearby pedestrians to cross the street. Ride one of their shadows to the stoplight and activate it, then hop into the next car to come along. It will take a left and go through the train crossing.
At this point, you can hop off the car and into the shadows of the canal’s guard rail. If you follow them for long enough, you’ll eventually find a guy with a fishing pole (above). Jump into his shadow and hit the interact button. He’ll catch the boot.
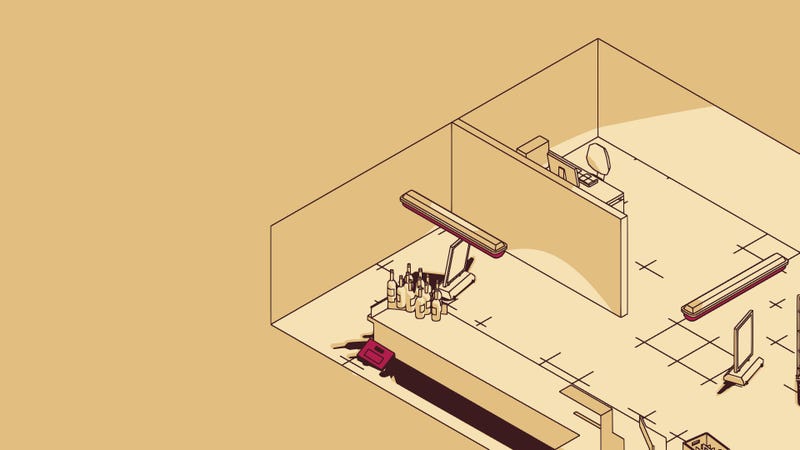
Level 49: Couch
This turns up stuck to a mailbox along the level’s critical path, right before the exit. It’s surprisingly easy to find. Plus, hey: free couch.
Level 50: Anchor
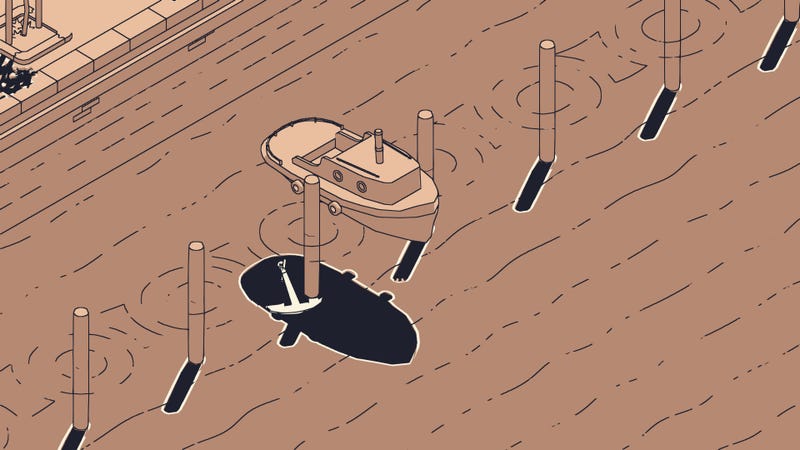
As you hop down the street at the start of the level, keep an eye on the lampposts on the right. One of them eventually hosts a lost schim who’s losing its whole damn mind. This is your visual cue that a collectible is nearby. Specifically, there’s an anchor in the canal, underneath the nearby tugboat.
Levels 51-62
Level 51: Camera
Head up into the square. When you see the kid playing in the geysers, wait until one goes off near you and use the water’s shadow to reach the kid’s shadow. That gives you a relatively safe place to stand while you wait for another geyser to go off in the right place, so you can cross to the park bench on the other side.
Having done so, use the nearby ad board to propel yourself to the parked scooter and keep working your way forward from here. At this angle, you can spot the camera (above, left), which is next to a bollard on the edge of the nearby crowd.
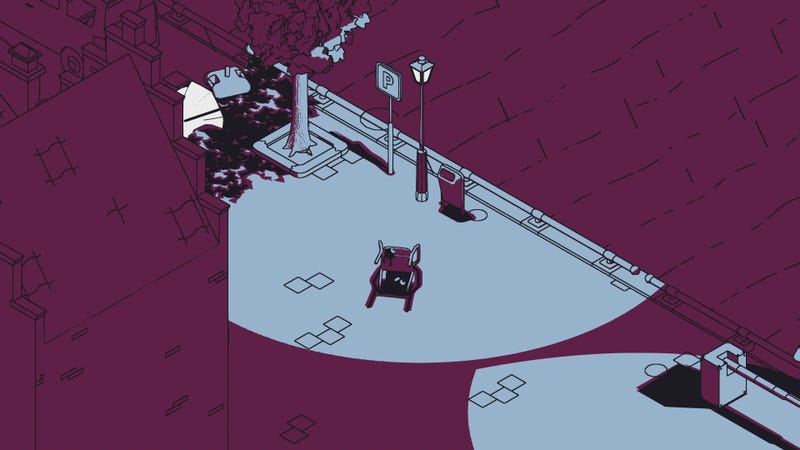
Level 52: Caution Sign
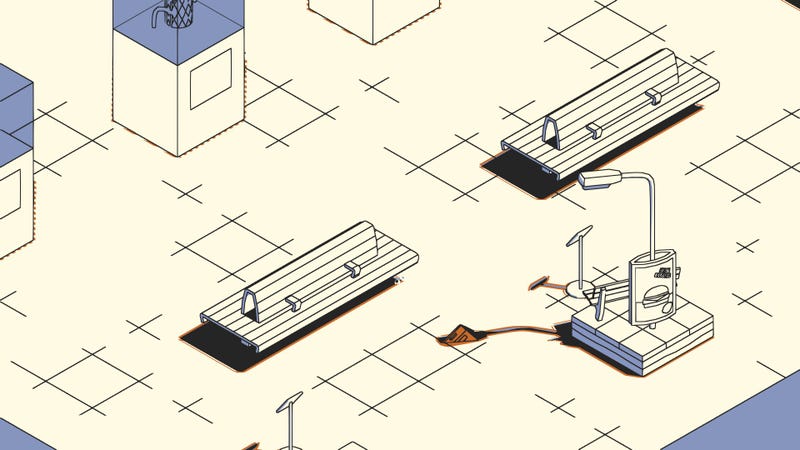
As you chase your human through the museum, you’ll trigger several different scenes of him at work. After the second one, where you see him walking around on the other side of an archway, go a little further into the room you’re currently in. You’ll find a collapsed caution sign next to one of the benches.
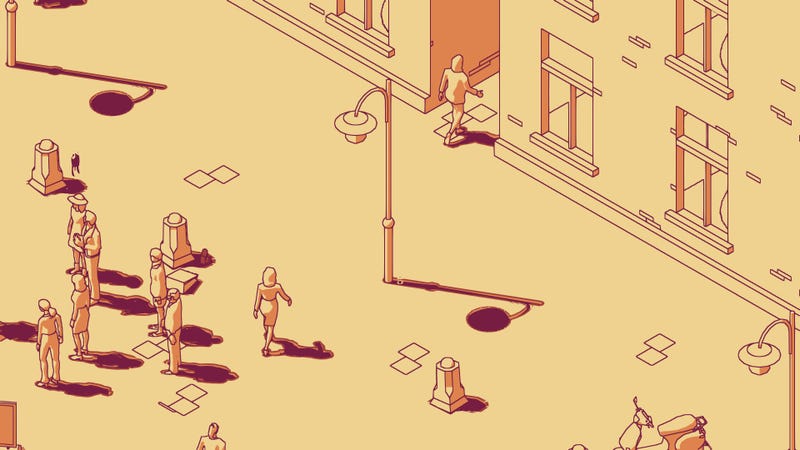
Level 54: Cardboard Cutout

You’re back outside the temp agency. Grab the cutout from the bus stop as you start the level. Easy.
Level 56: Order List
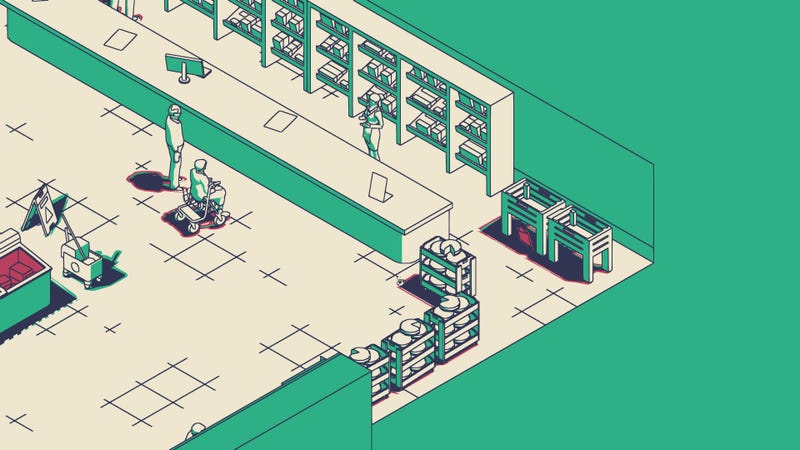
Go to the back corner of the supermarket. The order list has been dropped underneath a bin next to the customer service desk (above, right). This isn’t even that far out of your way, really.
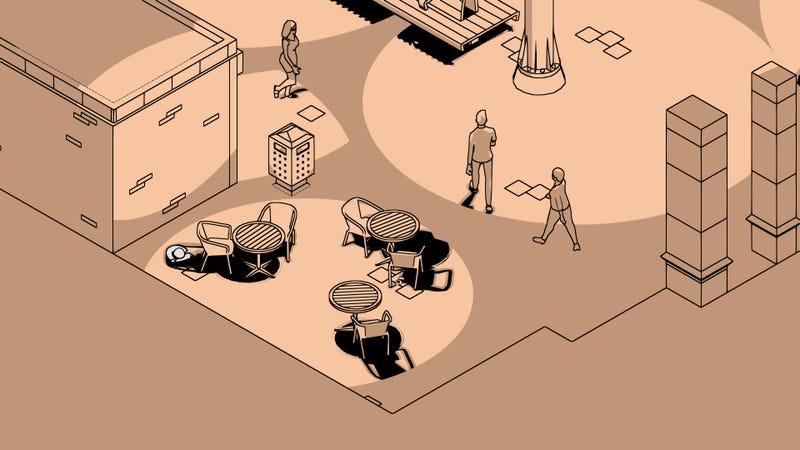
Level 57: Serving Tray
As you start the stage, look to the left. A lost schim is going nuts in the corner of a cafe’s outdoor seating. You’ll need to use a couple of the outdoor planters, a passing bicyclist, and a street sign to reach the cafe’s bike rack. From here, you can grab the serving tray, which is just barely visible behind a stack of cardboard boxes (above).
Level 58: Toy Elephant
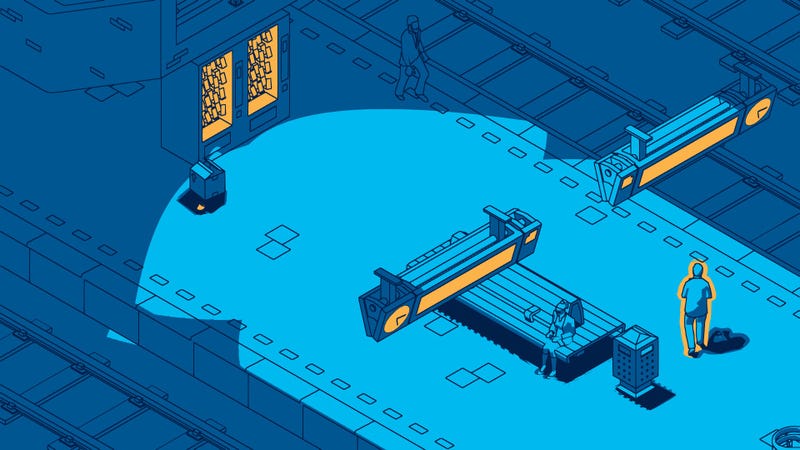
Once you reach the turnstiles, wait for a passerby and jump into their shadow. Most of them will immediately turn left and go into the bike parking area. The toy elephant is on its side underneath the second covered lot (above, center).
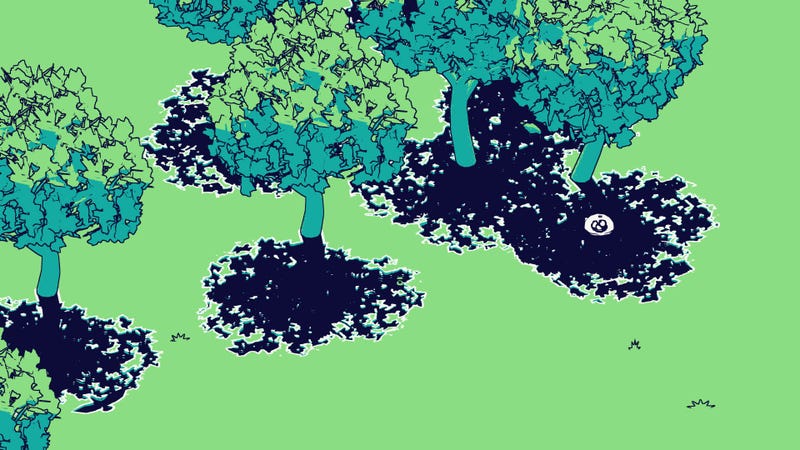
Level 59: Shovel
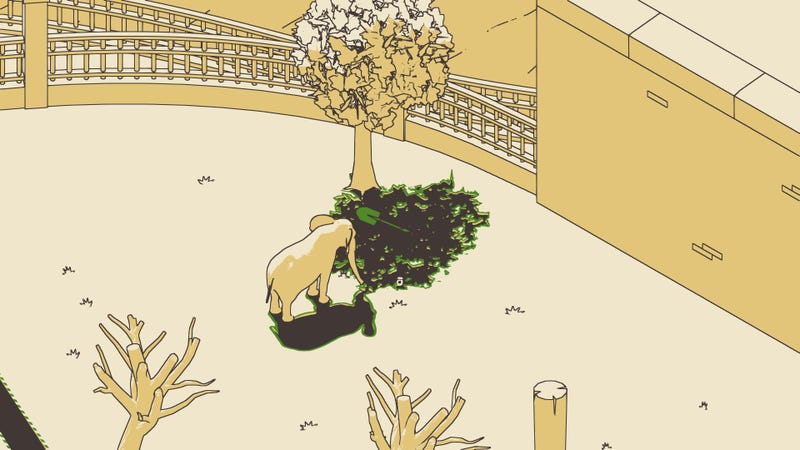
This is the last really tricky collectible in SCHiM. The shovel can be found in the far corner of the elephant pen, in the shadow of an isolated tree (above). It’s difficult to reach.
This might not be the intended solution, but you can get to the shovel by hopping into the baby elephant’s shadow and hitting the interact button. This makes the baby elephant follow you around until you leave the pen, much like the dogs on the beach from level 38.
If you deliberately despawn your schim a couple of times to lead the baby elephant to where you need it, you can position its shadow in just the right place to let you reach the shovel.
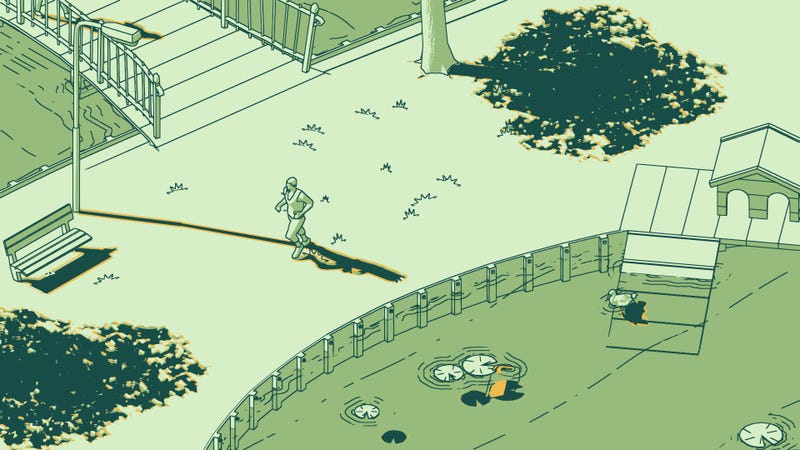
Level 59: Rubber Ducky
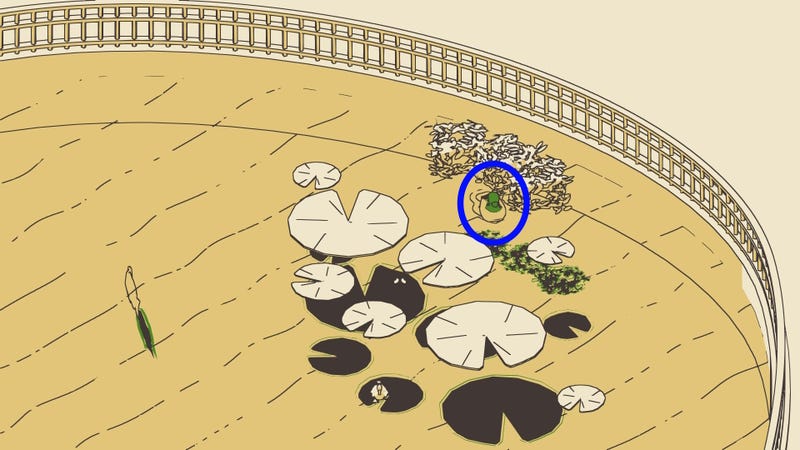
Hop into the pond next to the elephant pen. The rubber ducky’s a little hard to see (circled in blue, above), but it’s floating near the lily pads.
Level 60: Flowerpot
The flower pot is underneath a trash container at the edge of this level’s map (above, right). It’s close enough to your starting point that you can grab it in the first 20 seconds of the level.
Level 62: Swing Board
The final collectible in SCHiM is also the only one that can’t be missed. You’ll need to grab this in order to follow your human up the stairs at the end of the stage.
When you reach the staircase, turn on the light in the side room, then dig this out from behind the fallen stack of boxes. It’ll be placed right outside so you can fling yourself upstairs.
With that, you’ve found all the collectibles in SCHiM. The achievement should fire as soon as you acquire the last one. Congratulations!
.
Leave a Reply